
How To: Set up a 2-level factorial design using Minitab
Harness the benefits of Design of Experiments (DoE) with this guide to setting up your first design in Minitab!
Written by Andrew Macpherson, Managing Director.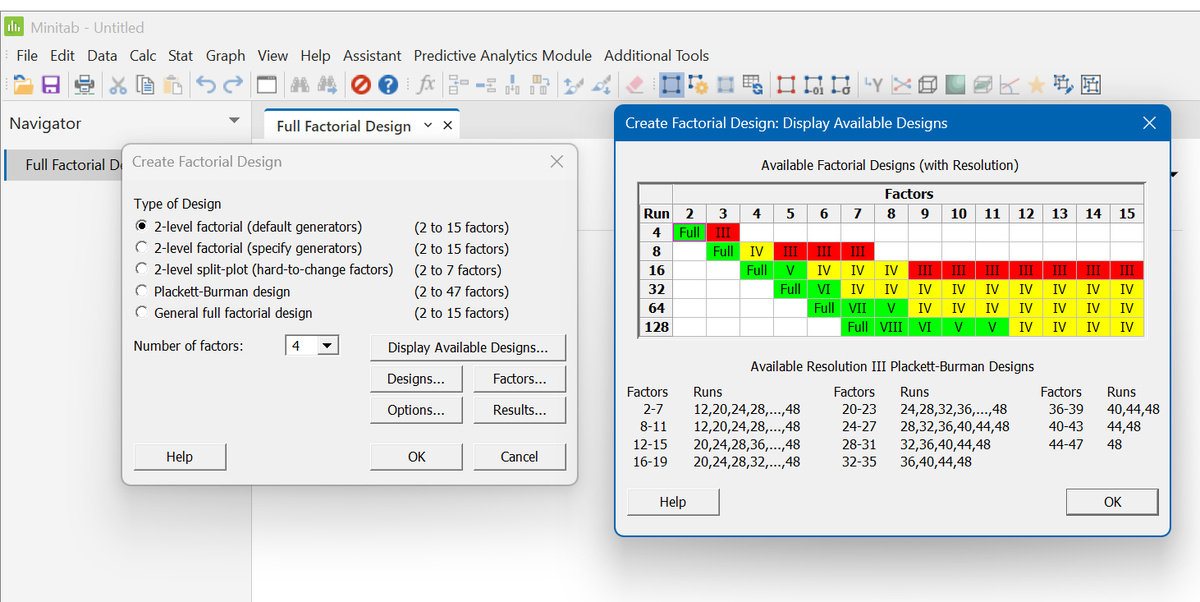
Screening designs are widely used to identify the critical few factors amongst the trivial many. These studies often use a 2-level factorial design, to strike the ideal balance between efficiency and effectiveness.
In this How To example, we're going to walk you through the process of setting up a 2-level full factorial design using Minitab, a popular general purpose statistical software package. We hope this basic step-by-step guide will help those of you starting out in the world of experimental design, whilst also acting as a useful tip sheet for attendees on our various DoE training courses.
Before beginning a DoE study, it is crucial to carefully consider all factors that you believe might affect the process, assay, formulation, product etc. that you are investigating. Additionally, it is essential to determine the most relevant and important responses for monitoring performance and to take into account the available resources for the study. Once these considerations have been made, you can proceed to construct your experimental design.
We're going to illustrate the creation of the experimental plan using a medical device manufacturing case study, in which we need to carefully control a laser welding process to meet our specific requirements. There are four factors that we plan to include in our initial design:
|
Factor |
Units |
Type |
Low Setting |
High Setting |
|---|---|---|---|---|
|
Laser Power |
kW |
Numeric |
2.15 |
4.15 |
|
Laser Speed |
m/min |
Numeric |
1.88 |
5 |
|
Gas Flow Nozzle |
l/min |
Numeric |
27 |
36 |
|
Gas Flow @Root |
l/min |
Numeric |
27 |
42 |
The objective of our study is to determine which factors are most important, and to understand how they might act synergistically together (or, potentially, antagonistically against each other!). If there are any factors that do not have an impact, then that would also be valuable information, as it will allow us to choose a convenient and/or economical setting to hold those factors at in future studies.
We have identified three critical responses that we are going to assess; if we are able to achieve the following goals, then our process will be deemed acceptable.
|
Response |
Units |
Goal |
Specification |
|---|---|---|---|
|
Weld Breakage |
mPa |
Maximise |
> 375 |
|
Weld Width |
mm |
Target |
1 ±0.25 |
|
Weld Skewness |
Minimise |
< 20 |
We will set up a 2-level full factorial design (usually denoted 2k, where k is the number of factors) - this will allow us to estimate the effect of our four factors, along with all of their interactions.
Top tip: after opening Minitab, we recommend displaying the “Factorial Designs” toolbar as a floating menu bar – this will allow quick and easy access to all of the design and analysis functions that we will need!
The following animation shows how we can display the toolbar, drag it away from the main menu area to make it “float”, then launch the Create Factorial Design dialog…
After opening the Create Factorial Design dialog from the floating toolbar (or, if you prefer to use the standard menu, you can access the same function via Stat > DOE > Factorial > Create Factorial Design), we can choose the type of design we wish to run, and specify the number of factors that we need to include. As shown above, we selected the default “2-level factorial (default generators)” option, and changed the number of factors to 4.
Clicking the Display Available Designs button provides us with a colour-coded table of available options – in our case, as we’re investigating 4 factors, the corresponding column below shows that we have two designs to pick from:
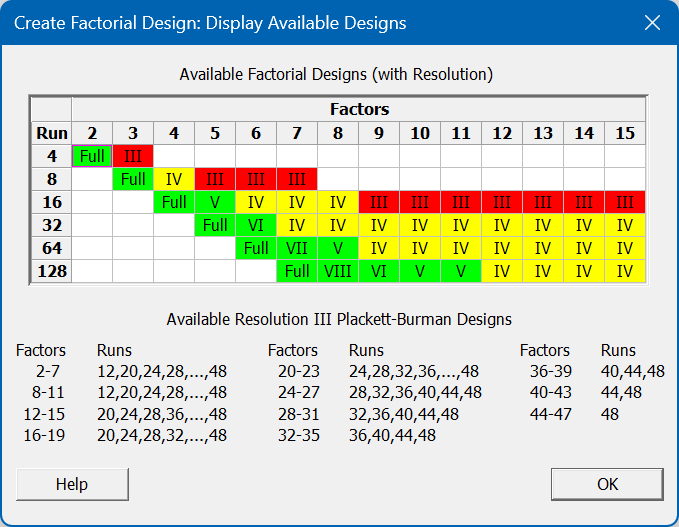
In this exercise we are going to choose the green “Full” factorial option; however, if we needed to minimise our resource then we may wish to consider the yellow Resolution IV design. Reading across to the left of the table, we can see that the Yellow and Full designs consist of 8 and 16 runs respectively; being informed of this before we start our study is extremely helpful, as it allows us to manage our resource appropriately. Having settled on the Full Factorial design, we can return to the previous Create Factorial Design dialog, where we need to press the Designs button to confirm our design options:
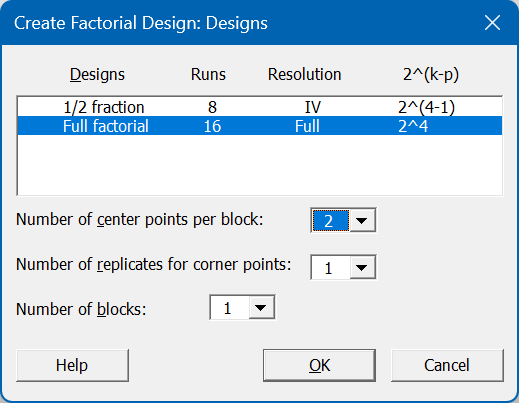
As the screenshot above shows, we have selected the “Full factorial” design and added two centre points. Centre points are a vital component of a factorial design, as they provide evidence as to whether a simple linear model is sufficient to describe the relationship between the input factors and output responses. In our popular Effective DoE Implementation training workshop, we discuss this topic in more depth, as well as demonstrating the appropriate next steps depending on whether the centre points do or don’t demonstrate evidence of curvature. We then click OK to return to the Create Factorial Design dialog, and then click the Factors button to define our input parameters:
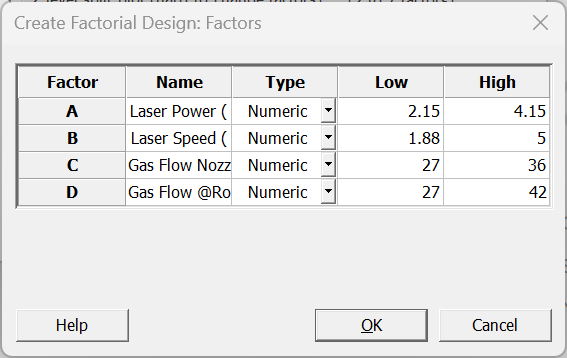
As shown above, we have entered the factor names, units, types (all of our factors in this example are “Numeric”), low and high settings. We then click OK, to return to the Create Factorial Design dialog for one final time, before clicking its OK button to generate our design...
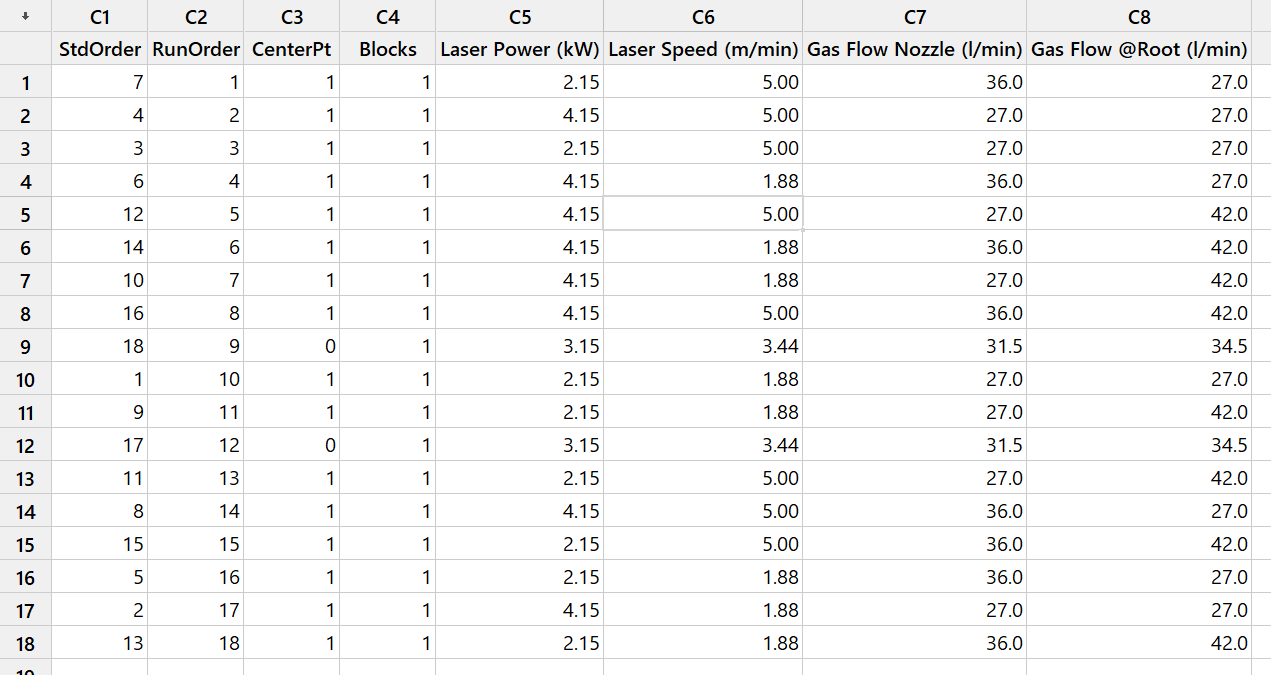
If you follow the steps described above and compare your design to the one shown here, then you may notice some differences… does this mean that you’ve made a mistake?? Probably not!
Every time a statistical software package creates a design, it will randomise the run order by default. Why? It is obviously inconvenient to perform your experiments in a jumbled up sequence, and would often be easier to arrange them in groups that minimise the number of times that you need to adjust your factor settings. However, you should NEVER do this without understanding the potentially serious risks – in short, you introduce the risk of your factors’ effects being confounded with external sources of variation, making your results harder to interpret (or, in the worst case scenario, misleading and inaccurate). Randomisation is an extremely important aspect of DoE, that ensures your data set is as reliable and fit-for-purpose as possible.
At this stage you have successfully created your first full factorial design – congratulations! You now need to take your design to the lab, and carry out the prescribed experiments in the randomised run order. Record your chosen response values for each experiment, and you’ll be ready to analyse your data – for a How To guide on analysing a factorial design in Minitab, please just click here.
If you found this guide useful, or are interested in the wide range of Design of Experiments workshops we offer, please contact us. We'd love to hear from you!
Be the first to know about new blogs, upcoming courses, events, news and offers by joining our mailing list here.